3 cups cooked white beans, rinsed and drained if canned
2 small celery ribs, thinly sliced
15 Spanish green olives, pitted and sliced
2 Tbsp chopped tarragon
1 Tbsp sherry vinegar
1 garlic clove, minced
½ tsp paprika
Salt and pepper
4-5 Tbsp extra virgin olive oil
Gently mix beans, celery, olives and tarragon in a large bowl. In a small bowl combine vinegar, garlic, paprika and salt, then whisk in oil. Taste and adjust seasonings then pour over bean mixture and mix gently again. Add pepper and serve at room temperature.
Wednesday, June 10, 2009
Broccoli Salad
¼ cup cooked, crumbled bacon
1 head fresh broccoli florets
½ cup raisins or Craisins
½ cup sunflower seeds
1 red onion, chopped
1 cup mayonnaise
1/4 cup sugar
2 Tbsp white wine vinegar
In a large bowl, mix together the bacon, broccoli, raisins, onion and sunflower seeds.
In a small bowl, whisk together the mayo, sugar and vinegar. Pour over broccoli mixture and toss to coat. Cover and refrigerate until chilled.
Tuscan Bean Salad
Tuscan Bean Salad
1 can kidney beans
1 can white beans
½ cup chopped fennel
¼ cup chopped red onion
¼ cup chopped celery
1 carrot chopped
3 Tbsp lemon juice
2 Tbsp olive oil
4 tsp sage
Prepare the vegetables, rinse the beans, mix the wet ingredients. Then mix it all together.
1 can kidney beans
1 can white beans
½ cup chopped fennel
¼ cup chopped red onion
¼ cup chopped celery
1 carrot chopped
3 Tbsp lemon juice
2 Tbsp olive oil
4 tsp sage
Prepare the vegetables, rinse the beans, mix the wet ingredients. Then mix it all together.
Monday, June 8, 2009
The Best Buttermilk Pancakes

I am not so good at making them pretty, but these babies 3/4 inch thick and light and fluffy.
I have never really thought much about pancakes. I know I don't like them to be dense or soggy, or to taste like too much baking soda (ie IHOP pancakes). With those requirements alone you would think I would have put some thought into what makes a pancake just right, right?
Well, I didn't have to. I opened up my latest issue of Cook's Illustrated and a test cook basically experimented and went back and forth trying to make the "Perfect Pancake". After reading the "experiment" I realized I had no idea the intricate dance each ingredient plays in making a pancake.
Buttermilk gives a unique taste that makes regular pancakes boring (and tasting like too much baking soda). But the acid in the buttermilk causes the baking soda to rise too rapidly which leads to deflated pancakes that are dense and soggy. Too much butter milk and you basically have two crusts mashed together with no light and fluffy insides. Lower the baking soda content and your pancakes are bland and pale. Lower the buttermilk and you don't have enough of that good flavor. So after a few tests the experimenting found a secret ingredient- sour cream!
Then I learned that the more you stir the more gluten forms in the batter and gluten makes baked goods tough. So to make the ultimately light and fluffy pancakes, whisk briefly (yep, its okay to have a few lumps) and then let the batter sit for 10 minutes so the gluten can relax.
After making these pancakes. I must agree, they are perfect. Now my next step is to work on making my pancakes "Look" perfect. My burners heat a little uneven and I am not good at pouring perfect circles. Oh well, my toddler and my husband eat em right up before they can even notice those details.
Best Buttermilk Pancakes
Marcus Walser
This recipe was tested using a lower protein flour like Gold Medal or Pillsbury. If using a higher protein flour like Kin Arthur, use an extra two Tbsp of buttermilk.
On an electric griddle, cook at 350 degrees.
Recipe says it makes 16 four inch pancakes. But mine must have been a little bit bigger since I only had about 10 and my toddler ate about 6 of them. So double up!
2 cups unbleached all purpose flour
2 Tbsp sugar
1/2 tsp salt
1 tsp baking powder
1/2 tsp baking soda
2 cups buttermilk
1/4 cup sour cream
2 large eggs
3 Tbsp butter, melted and cooled slightly
1-2 tsp vegetable oil
Whisk together the flour, sugar, salt, baking powder and baking soda. In a second bowl, whisk together the buttermilk, eggs, sour cream and melted butter. Make a well in the center of the dry ingredients and pour the wet ingredients into the well. Gently stir until just combined and do not worry about lumps. Let sit for 10 minutes
Meanwhile, add 1 Tbsp oil to the griddle or skillet and heat over medium heat. After a few minutes, wipe the oil out with a paper towel so just a thin film remains. Repeat after you have used half the batter for pancakes.
Test one very small pancake on your griddle to get an idea of how long a side needs to cook and if the temperature needs to be turned up or down.
Then, pour batter from a measuring cup into 4 inch circles on the griddle and cook about 2 minutes or until the sides begin to look cooked the bubbles about the size of a pencil eraser in the middle of each pancake are just beginning to break.
Serve with cut fruit, pureed berries, syrup, preserves, whipped cream, chopped pecans or caramelized apples Yum!
Sunday, May 31, 2009
Parmesan Chicken with Chopped Salad
For how moist and flavorful this recipe for Parmesan Chicken is, its surprisingly easy to prepare and feels like a full meal with a simple salad.
The Chopped Salad is not the easiest salad to make but its tasty. If you are short on time just make a green salad from any veggies you have in your fridge. The one pictured is spinach, carrots, snap peas, green onion and sun dried tomato.
Use your leftover yogurt and some fruit for a yogurt parfait afterward.
 Parmesan Chicken
2 Full Skinless, Boneless chicken breasts
2 cups Ritz crackers, smashed fine
3 Tbls. grated Parmesan cheese
1 tsp. seasoned salt
1/2 cup wheat germ
16 oz. plain yogurt
Put the chicken between two layers of plastic wrap and beat with a tenderizer. I like to use the back of an ice cream scoop. Dip chicken in yogurt or just spread yogurt over with your fingers on both sides. Mix crumbs, cheese, salt and wheat germ. Roll chicken in mixture until well covered on both sides. Place in a backing dish and bake at 350 degrees for 30-40 minutes.
The yogurt and cracker crumbs keep the moisture in the chicken so it is soft and flavorful. You could use a whole wheat cracker as long as its a fine, buttery cracker. Like the Stoneground Flaxseed Crackers from Costco.


 Note the breast on the left has been flattened to about 1/2 inch
 Ready to go in the oven
Chopped Salad
1 head of lettuce (romaine, green leaf or red leaf) shredded
Optional 2 handfuls spinach leaves washed and cut
2 tomatoes diced
1 cucumber diced
3-4 Tbsp Bacon Bits
1 cup cooked pasta (use some of the rotini for the week and just cut them in half after cooking)
1 chicken breast cooked and diced
1/2 cup feta cheese (or Gorgonzola)
4 scallions chopped
Creamy Dressing like Ranch, Blue Cheese, Cesar etc... (to taste)
The idea of this salad is that you chop everything into small pieces and mix it together with your favorite creamy dressing. You will forget you are eating salad mmmmmm.
Use spinach leaves too if you want to get an extra healthy boost :)
 Yogurt Parfait
Plain Yogurt
Powdered Sugar
Vanilla or Almond Extract
Cut Fruit or Berries
Granola or crushed cereal
Mix yogurt with powdered sugar to your taste. Layer in a glass or bowl with some cereal or granola and fruit for a simple and low fat dessert!
The Chopped Salad is not the easiest salad to make but its tasty. If you are short on time just make a green salad from any veggies you have in your fridge. The one pictured is spinach, carrots, snap peas, green onion and sun dried tomato.
Use your leftover yogurt and some fruit for a yogurt parfait afterward.
 Parmesan Chicken
2 Full Skinless, Boneless chicken breasts
2 cups Ritz crackers, smashed fine
3 Tbls. grated Parmesan cheese
1 tsp. seasoned salt
1/2 cup wheat germ
16 oz. plain yogurt
Put the chicken between two layers of plastic wrap and beat with a tenderizer. I like to use the back of an ice cream scoop. Dip chicken in yogurt or just spread yogurt over with your fingers on both sides. Mix crumbs, cheese, salt and wheat germ. Roll chicken in mixture until well covered on both sides. Place in a backing dish and bake at 350 degrees for 30-40 minutes.
The yogurt and cracker crumbs keep the moisture in the chicken so it is soft and flavorful. You could use a whole wheat cracker as long as its a fine, buttery cracker. Like the Stoneground Flaxseed Crackers from Costco.


 Note the breast on the left has been flattened to about 1/2 inch
 Ready to go in the oven
Chopped Salad
1 head of lettuce (romaine, green leaf or red leaf) shredded
Optional 2 handfuls spinach leaves washed and cut
2 tomatoes diced
1 cucumber diced
3-4 Tbsp Bacon Bits
1 cup cooked pasta (use some of the rotini for the week and just cut them in half after cooking)
1 chicken breast cooked and diced
1/2 cup feta cheese (or Gorgonzola)
4 scallions chopped
Creamy Dressing like Ranch, Blue Cheese, Cesar etc... (to taste)
The idea of this salad is that you chop everything into small pieces and mix it together with your favorite creamy dressing. You will forget you are eating salad mmmmmm.
Use spinach leaves too if you want to get an extra healthy boost :)
Yogurt ParfaitPlain Yogurt
Powdered Sugar
Vanilla or Almond Extract
Cut Fruit or Berries
Granola or crushed cereal
Mix yogurt with powdered sugar to your taste. Layer in a glass or bowl with some cereal or granola and fruit for a simple and low fat dessert!
Tuesday, May 26, 2009
Strawberry Shortcake
INGREDIENTS
• 3 pints fresh strawberries
• 1/2 cup white sugar
• 2 1/4 cups all-purpose flour
• 2 teaspoons baking powder
• 1/4cup white sugar
• 1/4 teaspoon salt
• 1/2 cup butter
• 1 tsp vanilla
• 1 egg
• 2/3 cup milk
• 2 cups whipped heavy cream
• ½ cup powdered sugar
• Almond extract
DIRECTIONS
1. Slice the strawberries and toss them with 1/2 cup of white sugar. Set aside.
2. Preheat oven to 425 degrees F (220 degrees C). Grease and flour one 8 inch round cake pan.
3. In a medium bowl combine the flour, baking powder, 2 tablespoons white sugar and the salt. With a pastry blender cut in the shortening until the mixture resembles coarse crumbs. Make a well in the center and add the beaten egg and milk. Stir until just combined.
4. Spread the batter into the prepared pan. Bake at 425 degrees F (220 degrees C) for 15 to 20 minutes or until golden brown. Let cool partially in pan on wire rack.
5. Slice partially cooled cake in half, making two layers. Place half of the strawberries on one layer and top with the other layer. Top with remaining strawberries and cover with the whipped cream.
Sunday, May 24, 2009
Not Your Average Burger and Potato Salad
Last Monday when I brought up grilling I wasn't thinking about all the grilling people would be doing today. But my sister found these recipes which reminded me- oh ya! Memorial Day!
So, if you were like me and weren't thinking (i.e. you still have to run to the store this morning) I hope you are reading. But if you are a good planner then save this meal for later cause its gonna be good.
I mean I haven't made it yet- I am doin it today- but my taste buds are just watering. Does it gross you out when I say that? For some reason the word "taste bud" gives me the heebie jeebies.
Anyway:
Flank Steak Pinwheels- Steak, sun-dried tomatoes, spinach and Boursin cheese- need I say more?
Aida's Corn, Tomato and Avocado Salad- recipe name explains it all- except who is Aida?

Lower Fat Strawberry Shortcake- Ladies- if you are still doing "shortcake" without the shortcake and buying that dry, store bought "cake" you have got to try this. Real shortcake does have lots of butter in it so, I want to try this one that substitutes low fat cream cheese for some of the butter and low fat sour cream for some of the whipping cream.

Also if your kids are handy at pushing the button on the food processor, you can make some of these yummy popsicles to eat outside.
So, if you were like me and weren't thinking (i.e. you still have to run to the store this morning) I hope you are reading. But if you are a good planner then save this meal for later cause its gonna be good.
I mean I haven't made it yet- I am doin it today- but my taste buds are just watering. Does it gross you out when I say that? For some reason the word "taste bud" gives me the heebie jeebies.
Anyway:
Flank Steak Pinwheels- Steak, sun-dried tomatoes, spinach and Boursin cheese- need I say more?
Aida's Corn, Tomato and Avocado Salad- recipe name explains it all- except who is Aida?
Lower Fat Strawberry Shortcake- Ladies- if you are still doing "shortcake" without the shortcake and buying that dry, store bought "cake" you have got to try this. Real shortcake does have lots of butter in it so, I want to try this one that substitutes low fat cream cheese for some of the butter and low fat sour cream for some of the whipping cream.
Also if your kids are handy at pushing the button on the food processor, you can make some of these yummy popsicles to eat outside.
Monday, May 18, 2009
Patio Dinner Without The Patio
I admit it, I don't know how to grill. Growing up my father manned the grill and since I have been married my husband and I have never owned a grill or even had a patio to put one on! So, when we want to have "summer grill" type food I make this:
Oven Fried Buttermilk Chicken
Creamy Coleslaw- Shred your own cabbage and carrots or buy the pre-shredded mix
Baked Beans- If you don't want to buy Baked Beans from the store try this recipe.
Serve those dishes up with some watermelon and an ice cold drink and you have got yourself a quick and easy patio dinner.
Sunday, May 17, 2009
Oven Fried Chicken
I am not into frying things. Its pretty high in calories and makes my apartment stink. So I like to make "Oven Fried Chicken" the idea is that the chicken bakes slowly while the flour coating browns with the chicken's juices and a little bit of oil sprayed or brushed onto the coating before baking. I am not saying its as good as fried chicken- buts I will take it over regular baked chicken (and saddlebags) anyday!
3 large chicken breasts
2 cups buttermilk
1 cup white flour
½ cup wheat germ
2 tsp pepper, black
2 tsp salt
2 tsp of any other seasonings you would prefer (red pepper flakes, paprika, Italian seasoning, thyme, sage etc…)
oil preferably in a mister (or PAM)
Preheat oven to 350 degrees F. Wash chicken and pat dry. Place the chicken in a dish and pour the buttermilk over it. Refrigerate for an hour to overnight.
Mix flour, salt, pepper and wheat germ and any spices you may be using. After letting the chicken sit, pour out excess buttermilk. Cover with half the flour mixture, pat the flour until it adheres and is evenly spread, then flip the breasts and cover with the remaining flour.
 Evenly space chicken on greased baking pan.
 Lightly, spray with some oil spray or lightly brush with some oil.
Bake for about 60 minutes. Do not turn chicken during baking. Chicken will be done when the flour has browned and is sizzling.

Creamy Cole Slaw
modified recipe from Barefoot Contessa
To make a super fast Cole Slaw I buy the pre-shredded cabbage and add more shredded carrots.
Ingredients
1 pound white cabbage (1/2 small head)
3/4 pound red cabbage (1/2 small head)
5 carrots
2 cups good mayonnaise
1/4 cup Dijon mustard
5 tablespoons sugar
2 tablespoons cider vinegar
2 teaspoons celery seeds
1 teaspoon celery salt
1/2 teaspoon kosher salt
1/2 teaspoon freshly ground black pepper
Directions
Fit a food processor with the thickest slicing blade. Cut the cabbages into small wedges and place horizontally into the feed tube. Process in batches. Next, fit the food processor with the grating blade. Cut the carrots in half and place in the feed tube so they are lying on their sides. Process in batches and mix in a bowl with the grated cabbages.
In a medium bowl, whisk together the mayonnaise, mustard, sugar, vinegar, celery seeds, celery salt, salt, and pepper. Pour enough of the dressing over the grated vegetables to moisten them. Serve cold or at room temperature.
Boston Baked Beans

2 cups dry or 2 cans navy beans
1/2 pound bacon optional
1 onion, finely diced
3 tablespoons molasses
2 teaspoons salt
1/4 teaspoon ground black pepper
1/4 teaspoon dry mustard
1/2 cup ketchup
1 tablespoon Worcestershire sauce
1/4 cup brown sugar
If using dry beans, soak beans overnight in cold water. Simmer the beans in the same water until tender, approximately 1 to 2 hours. Drain and reserve the liquid.
Preheat oven to 325 degrees F.
Arrange the beans in a 2 quart casserole dish by placing a portion of the beans in the bottom of dish, and layering them with bacon and onion.
In a saucepan, combine molasses, salt, pepper, dry mustard, ketchup, Worcestershire sauce and brown sugar. Bring the mixture to a boil and pour over beans. Pour in just enough of the reserved bean water or water to cover the beans. Cover the dish with a lid or aluminum foil.
Bake for 3 to 4 hours in the preheated oven, until beans are tender. Remove the lid about halfway through cooking, and add more liquid if necessary to prevent the beans from getting too dry.
Saturday, May 2, 2009
BLT Salad
Lettuce Greens, washed, dried and broken
*To make a crisp salad I soak the greens in ice water for at least 20 minutes before dinner. Then dry by laying out the leaves on a dishtowel and softly patting with another dishtowel, or in a salad spinner.
1 large tomato, diced
1 avocado, diced
1/4 cup crumbled bacon or real bacon bits
Store bought Creamy Parmesan Dressing
Assemble the salad by topping the greens with diced tomato, avacodo and bacon. Serve with your favorite creamy dressing.
Simple Antipasti Plate
fresh mozzarella balls (if they are the smaller than a golf ball leave whole, if large balls slice them and then quarter the slices)
grape tomatoes
mixed pitted olives
crusty bread
Pesto
salt, pepper, olive oil
Slice the bread and spread with pesto on each slice, then cube the bread. Arrange the cheese, tomatoes, olives and bread on a platter. Drizzle with olive oil, salt and fresh ground pepper. Serve with toothpicks.
grape tomatoes
mixed pitted olives
crusty bread
Pesto
salt, pepper, olive oil
Slice the bread and spread with pesto on each slice, then cube the bread. Arrange the cheese, tomatoes, olives and bread on a platter. Drizzle with olive oil, salt and fresh ground pepper. Serve with toothpicks.
Aunt Patsy's Super Moist, Super Chocolatey Cake
1 box chocolate cake mix
1 box chocolate pudding
4 eggs
1 cup sour cream
1/2 cup water
1/4 cup oil
1/2 tsp vanilla
1 cup pecans or walnuts chopped
12 oz semi sweet chocolate chips
Mix the cake mix, pudding mix, eggs, sour cream, water, oil and vanilla in a large bowl until smooth. Add the nuts and chocolate chips mixing until incorporated. Grease and flour and bundt pan for a cake or use cupcake foils to make cupcakes.
Bake at 350 degrees F for 15-20 min for cupcakes and 30-45 min for the cake. A toothpick should come out clean from the center when the cake it done.
You can serve the cake with a dusting of powdered sugar or drizzle with fudge sauce.
Lazy Lasagna
1 28 oz jar spaghetti sauce- I love Classico Fire Roasted Tomato
1 cup water
16 oz cottage cheese
2 cups grated mozzarella- buy a block at Costco and put chunks in your food proccesor to save yourself all the shredding
1/2 cup grated Parmesan cheese
8 oz lasagna noodles, uncooked
optional- fresh spinach leaves, washed and de stemmed
Mix water with the spaghetti sauce. Layer sauce, mozzarella cheese, noodles, and spinach (if using) in a 9x13 baking dish. Alternate ingredients so you make 3-4 layers. Spread the Parmesan over the top. Cover the dish tightly with tin foil and bake at 350 degrees F or 45 min. Remove foil and bake for a few more minutes until the cheese browns a little. Let sit for about 15-20 min before serving.
Saturday, April 25, 2009
Crunchy Asian Salad
Makes a very large salad- great for parties.
2 heads green lettuce, broken bite size peices
1-2 bunches grn onions chopped
very small red cabbage, shredded
4 carrots, shredded
1 red pepper, chopped
optional cooked chicken chunks
2 Tbsp butter
2 packages of Ramen noodles, broken without sauce powder
3/4 cup sliced almonds
1/3 cup sesame seeds
1/3 cup vinegar
1/2 cup sugar
2/3 cup oil
3 Tbsp soy sauce
Optional Ground Flax seed- I add this to the crunchy noodle mixture after toasting.
Prepare the vegetables and optional chicken and throw together in a large bowl.
 Melt the butter in a saucepan and toast the Ramen noodles, then almonds and then sesame seeds. Watch carefully so not to burn.


In a ziploc bag, tupperware, empty jar or salad cruet mix the vinegar, sugar, oil and soy sauce until well mixed.
Pour noodles and nuts over individual salads and dress just before serving.
2 heads green lettuce, broken bite size peices
1-2 bunches grn onions chopped
very small red cabbage, shredded
4 carrots, shredded
1 red pepper, chopped
optional cooked chicken chunks
2 Tbsp butter
2 packages of Ramen noodles, broken without sauce powder
3/4 cup sliced almonds
1/3 cup sesame seeds
1/3 cup vinegar
1/2 cup sugar
2/3 cup oil
3 Tbsp soy sauce
Optional Ground Flax seed- I add this to the crunchy noodle mixture after toasting.
Prepare the vegetables and optional chicken and throw together in a large bowl.
 Melt the butter in a saucepan and toast the Ramen noodles, then almonds and then sesame seeds. Watch carefully so not to burn.

In a ziploc bag, tupperware, empty jar or salad cruet mix the vinegar, sugar, oil and soy sauce until well mixed.
Pour noodles and nuts over individual salads and dress just before serving.
Coconut Chicken with Mango Salsa

1 lb Chicken Tenders
1/2 bag flaked coconut
1 c. Coconut milk
1 tsp salt
1/2 tsp pepper
1/2 tsp curry powder or 1 tsp if you like it spicier
Heat oven to 400 degrees. Spread coconut on a cookie sheet. Toast in the oven until just barely golden brown, about 7 minutes. (Keep your eye on it so it doesn’t burn.) Once the coconut is toasted pull out of the oven and let stand for 2 minutes. I leave a little bit of white since this will go back in the oven with the chicken.

Cut chicken into 1 inch cubes place in a mixing bowl. Toss with salt, pepper and curry powder. Pour coconut milk over chicken mix until well coated. Then coat the coconut milk chicken in the flaked coconut. I just pour all the coconut (reserve 1/4 cup for your coconut rice!) in with the chicken stirring it with one hand. Spread the coated chicken pieces on a greased baking sheet so that they are not touching . Bake the chicken pieces at 400 degrees for 15 minutes until they are golden brown. Serve with Mango Salsa.
Mango Salsa
1 ripe mango , peeled, pitted, and diced (about 1 1/2 cup) (See: How to Cut a Mango)
1/2 medium red onion, finely chopped (if the onion is bigger than a baseball use 1/4 of it)
1 Jalapeño chile, minced (include ribs and seeds for a hotter taste if desired)
3 Tbsp fresh cilantro leaves, chopped
3 Tbsp fresh lime juice
Salt and pepper to taste
Also good with diced red bell pepper and jicama.
Watch the tutorial on How to Cut a Mango. Once ou have cut away the pit, rather than cubing it and then cutting off the skin, I cut off the skin and cut it sideways into very thin slices. Then I cross cut it like so:

Then I turn those pieces on their side with the knife and cut in half. This way you end up with tiny salsa size mango cubes.

Combine all of the ingredients in a bowl. Season to taste with salt and pepper. If the salsa ends up being a little too hot or acidic for your taste, you can temper it by adding some diced avocado.
Asian Fusion
After my husband took me to Asia de Cuba and I realized the joys of fusion food I was inspired to try some recipes at home. Enter Coconut Chicken with Mango Salsa, Coconut Rice and a crunchy Asian Salad.
The coconut chicken is surprisingly easy and paired with the hot n sweet mango salsa you will be licking your lips. I know we were. It was like "What About Bob" at our house with my husband exclaiming "Mmmmm!"..."Mmmmm this is sooo good!"
The coconut rice is mild and at first just tastes like rice, and then slowly you taste more and more coconut and have to have another bite, and another....
And the crunchy Asian Salad is one of my old faves I new would go well with the rest of the meal. The dressing is simple to make and the toasted Ramen noodles, almonds and sesame seeds add the nice crunch.
Prepare the salsa first so the flavors have time to meld. Then prepare the salad ingredients keeping the noodle mixture and dressing separate until serving. The rice and chicken should be cooked just 30 min before dinner time so they are nice and hot.
Coconut Chicken with Mango Salsa
Coconut Rice
Crunchy Asian Salad
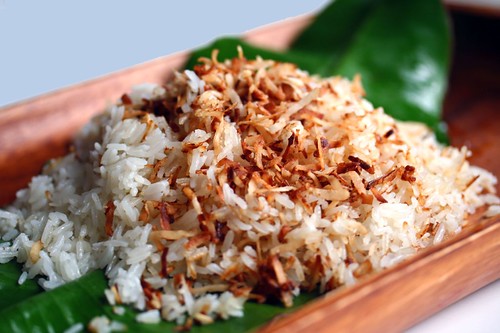
Coconut Rice
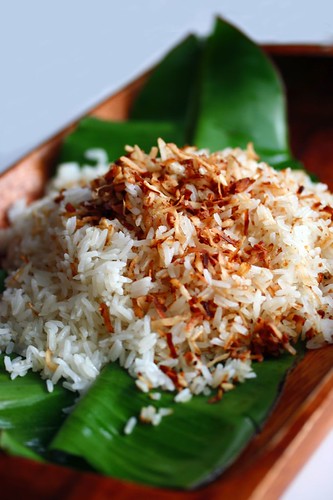 Recipe and Photo by Steamy Kitchen
1 tablespoon butter
1 tablespoon brown sugar
1 teaspoon sea or kosher salt (or 1/2 teaspoon table salt)
2 cups jasmine rice, washed and drained well
1 1/2 cups good, thick coconut milk (shake can to mix well before opening)
1 1/2 cups water
1/4 cup sweetened coconut flakes
This recipe is from Steamy Kitchen and I think it is yummy! It turned out perfectly and I didn't even use jasmine rice- just regular white long grain rice- not instant though!
Heat butter a medium sized, heavy saucepan over medium heat. When butter is melted, add brown sugar and salt, stir until dissolved. Turn heat to high, add rice and stir until all grains coated evenly. Add coconut milk and water. Stir. When boiling, immediately cover with tight fitting lid, turn heat to medium-low and simmer undisturbed for 20 minutes. Remove pot from heat but do not open lid. Really, no peeking! Let sit for 10 minutes. While rice is cooking, toast coconut flakes on a dry skillet over medium high heat. Stir frequently to avoid burning, remove from pan as soon as coconut is golden brown, about 2 minutes.
Sunday, April 19, 2009
Eggs Benedict with Hollandaise Sauce
4 egg yolks
1 tablespoon freshly squeezed lemon juice
1/2 cup unsalted butter, melted (1 stick)
Pinch cayenne
Pinch salt
Vigorously whisk the egg yolks and lemon juice together in a stainless steel bowl and until the mixture is thickened and doubled in volume.
Place the bowl over a saucepan containing barely simmering water (or use a double boiler,) the water should not touch the bottom of the bowl. Continue to whisk rapidly. Be careful not to let the eggs get too hot or they will scramble. Slowly drizzle in the melted butter and continue to whisk until the sauce is thickened and doubled in volume.
Remove from heat, whisk in cayenne and salt. Cover and place in a warm spot until ready to use. If the sauce gets too thick, whisk in a few drops of warm water before serving.For Eggs Benedict:
Water
1/2 cup distilled vinegar, divided
12 large eggs
12 slices Canadian bacon
6 English muffins, split
Pour enough water into a skillet to reach a depth of about 3 inches, and add the vinegar. Bring skillet to a gentle simmer over medium heat. Crack an egg into a cup and carefully slide it into the hot poaching liquid. Quickly repeat with all the eggs. Poach the eggs, turning them occasionally with a spoon, until the whites are firm, or to the desired degree of doneness, about 3 to 5 minutes. Using a slotted spoon, remove the eggs and transfer to a kitchen towel. Lightly dab the eggs with the towel to remove any excess water.
While the eggs are poaching, heat the bacon or ham in a skillet or microwave until warm.
To serve, toast the English muffin halves and divide them among plates. Top each half with a slice of Canadian bacon, and set an egg on top. Spoon the hollandaise sauce over the eggs and garnish with the chives. Serve immediately.
Monday, April 6, 2009
Tri-Color Sweet Pepper Quiche Re-Do

The first time I made the Tri-Color Sweet Pepper Quiche. I was worn out by the process and the list of ingredients. And the long strips of pepper that would pull out of the quiche when you went to take a bite overwhelmed the other flavors. But I knew the recipe had potential. So, here is my much easier and I think, tastier version. You will save a lot of time using store bought roasted peppers, pesto and pie crust rather than making all that from scratch as the original recipe directs. And the overall taste is improved by dicing the pepper- so you spread the taste rather than getting whole bites of just pepper.
We eat this for breakfast or dinner and it makes a great dish for brunch parties.
Red Pepper and Olive Quiche
1 jar of roasted peppers, diced
4-5 Tbsp pesto
2 whole eggs plus 2 egg yolks
1 cup milk
1/2 cup heavy whipping cream
1 cup grated cheese (your favorite “white cheese” provolone, Monterey Jack etc..)
1/2 cup pitted olives (kalamata or Spanish), sliced
1 Pie Crust
Optional 2 handfuls spinach sliced very thinly
1. Preheat the oven to 400°F and prebake the pie crust until just before browning. (You will see the “wetness” has gone out of the dough.)
2. Prepare the peppers, olives, spinach (if using) and cheese (dicing, slicing and grating.)
3. Prepare the egg mixture. Whisk together the eggs and yolks in a bowl. Add the milk, heavy cream and about 1/2 teaspoon salt and whisk till smooth.
4. To assemble the quiche, spread the pesto across the bottom of the crust. Top with half of the cheese, then all the peppers and spinach if using. Dot the olives over that. Spread the remaining cheese and pour in the egg and cream mixture.
5. Bake for 40 to 45 minutes, or until a knife inserted in the center comes out clean and the edges of the crust are very golden. Remove and let rest for 10 minutes, then serve.
Monday, March 30, 2009
Tiramisu

For real Tiramisu connoisseurs this recipe won't be as authentic as you may like. There is no liquor and the espresso is substituted with Pero or Postum. But for those who have stayed away from Tiramisu for those very ingredients- now you can enjoy it! You will find all sorts of recipes out there and they vary wildly. I have fiddled around with them and this is what I have come up with.
 Most recipes recommend refrigerating for 1 hour. I find that after only an hour though, the tiramisu is soupy. I think the dessert is best served when prepared in the morning and kept in the fridge all day- or made the day before. It will be firmer and have better flavor.
6 eggs, yolks and whites separated
½-3/4 cups sugar (1/2 for a more authentic taste)
1 Tbsp vanilla
16 oz mascarpone cheese
2 ½ cups milk
2 Tbsp Pero or Postum drink mix
About 28 Ladyfingers
4 Tbsp cocoa powder (or even better- chocolate shavings)
In a small bowl beat egg whites with a mixer with whisk attachment until the whites are firm. They are firm enough when the beater is lifted straight out of the bowl, turned upside down and the egg white on the beater maintains its shape.

In a separate bowl, mix the egg yolks, sugar and vanilla until the mixture is a pale yellow. Add mascarpone and mix until smooth.

Gently fold the stiff egg whites into the mascarpone mixture.

 In a shallow dish or bowl, mix the milk and Pero or Postum until the drink mix is dissolved. One at a time, dip the ladyfingers into the mixture. Turn the lady finger so each side is dipped twice. The ladyfinger should soften on the outside but still maintain its form (a little hardness on the inside)- you don’t want them to be soggy.


 Place the half of the ladyfingers in the bottom of a 9x13 dish. Cover with half of the mascarpone mixture. Using a sieve dust cocoa powder over that until it is covered. Repeat making another layer with the remaining lady fingers and cheese. Save the cocoa powder over the top until you are ready to serve. Otherwise it will soak up some of the liquid from the cheese and look "spotty".

Monday, March 23, 2009
Pad Thai

Pad Thai is one of my many favorite Asian food dishes. I really enjoy the combination of the sweet and sour sauce, the crunchy sprouts, chewy noodles and cilantro overtones.
I sometimes buy the Taste of Thai box mix at the store but we eat it in one sitting and I wish (for the price and for my love of the stuff) that we had leftovers. So, this weekend I made it from scratch and it wasn't too hard! We had plenty of leftovers to enjoy for lunches and now I have many of the ingredients to use again next time.
One way to cut down on the prep is to put aside some chicken from another recipe, cube it and just mix it in to the Pad Thai when you mix in the sprouts, egg and cilantro.
Sprouts are a great nutritional source of Vitamin A- but if you still feel the need for some veggies. Steam up some snow peas and red peppers with a little of your Pad Thai sauce.


Ingredients:
8-10 oz. Thai rice noodles, linguini-width
1 to 1 1/2 cups raw chicken breast or thigh meat, cubed
4 cloves garlic, minced
3 cups fresh bean sprouts
3 green onions, sliced
1/3 cup crushed or roughly chopped peanuts (or other nuts, such as cashews)
1/4 cup chicken stock
1/4 tsp. black pepper
½ cup cilantro, leaves pulled from the stems
2 eggs, scrambled
Lime wedges or juice squeezed over meal to add some citrus taste
Sauce:
3/4 Tbsp. tamarind paste dissolved in 1/4 cup warm water (look for tamarind at Asian/Chinese or Indian food stores)
2 Tbsp. fish sauce (optional, I don’t like the fishy taste so I don’t use this and substitute soy sauce)
1-3 tsp. chili sauce (depending how spicy you want it) (I use a "sweet chili sauce" see above)
3 Tbsp. brown sugar (not packed)
Preparation:
1. Place noodles in a pot of water and place on the stove. Bring to near a boil, then remove from heat. Allow to sit while you prepare the other ingredients (about 10 minutes).
2. Combine the sauce ingredients together in a cup, stirring well to dissolve both the tamarind paste and the brown sugar.
3. Check the noodles. Noodles are ready when they are soft enough to be eaten, but are still firm and chewy. Drain and rinse through with cold water.
4. Warm up a large frying pan over medium-high heat. Add 1-2 Tbsp. oil plus garlic. Add the chicken. Stir-fry 30 seconds to 1 minute. Add chicken stock 1-2 Tbsp. at a time until the chicken pieces are cooked (about 5-8 minutes).
5. Add the noodles, and pour sauce over it. Using two spatulas, wooden spoons, or other utensils, quickly stir-fry the noodles. Use a "lift and turn" method (like tossing a salad) instead of the usual stir-frying motion, or the noodles may break apart.
6. Fry the noodles in this way for 1-2 minutes. If you find your wok/frying pan too dry, push noodles aside and add a little more oil to the bottom (but no more broth, or the noodles will become soggy).
7. Add the bean sprouts, egg and black pepper. Continue "tossing" for 1 more minute, or until noodles are cooked. Noodles are done to perfection when they are no longer "hard" or translucent. They should be opaque and chewy-sticky wonderful!
8. Taste-test the noodles for seasoning, adding more fish sauce as needed (I usually end up adding up to 1 more Tbsp. fish sauce, as I like mine on the salty side). Toss well to incorporate.
To serve, lift the noodles onto a serving plate. Top with generous amounts of cilantro, green onion, and chopped nuts and lime juice/ wedges.
photos from FreshDirect.com
Monday, March 16, 2009
Slow Cooking: Hearty Beef Stew

I was pleasantly surprised to find a trial issue of Cook's Country in my mailbox a few weeks ago. It's by the same authors as Cook's Illustrated and America's Test Kitchen- both of which I love for their experiment style approach to cooking. They give you the tried and true recipes, tips and know how. The recipes in Cook's Country seem to be more down to earth, homey, comfort food recipes. One of which, is the Slow Cooker Hearty Beef Stew.
The recipe title did not catch my eye since I don't really like beef stew- the vegetables are always turned to baby food by the time the meat is cooked and the whole thing just tastes of mud covered with salt. But when I went to turn the page I noticed, included with the recipe, was a picture of a crock pot with an aluminum foil Hobo Pack (aka tin foil dinner) set inside. This intrigued me so I read the cook's commentary and recipe.

Sure enough, this cook was looking for a way to cook the meat and the vegetables to perfection so that the flavors married. The recipe has you steam the vegetables in a tin foil pack on top of the beef in the slow cooker. The other tricks are to brown the meat first, add a dash of soy sauce for a beefy flavor no one will ever guess is soy sauce, and to thicken the stew without a starchy texture by using tapioca.
Not only can you cook this in your crock pot while you are away, you can prep this stew the night before by cutting the vegetables and browning the meat and onions. Store the meat from Step One and onion mixture from Step Two in different bags. In the morning put it all in the slow cooker with the hobo pack on top and get it started.
Hearty Beef Stew
from Cook's Country by Diane Ungar
serves 6-8
5 lb boneless beef chuck-eye roast, cut into 1 1/2 inch cubes
salt and pepper
3 Tbsp vegetable oil
4 medium onions, chopped fine
1 6 oz can tomato paste
2 cups chicken or beef broth
3 Tbsp soy sauce
1 lb carrots, peeled and cut into 1 in pieces (1 1/2 to 2 inches if cooking longer than 10 hours)
1 lb parsnips, peeled and cut into 1 in pieces (1 1/2 to 2 inches if cooking longer than 10 hours)
1 lb red potatoes, peeled and cut into 1 in pieces (1 1/2 to 2 inches if cooking longer than 10 hours)
1 1/2 tsp thyme
2 bay leaves
2 Tbsp Minute tapioca
2 cups frozen peas, set out to thaw
1. Dry beef with paper towels then season with salt and pepper. Heat 1 Tbsp oil in large skillet over med high heat until just smoking, add half of beef and brown on all sides about 8 min. Transfer to slow cooker and repeat with remaining beef.
2. Add 1 Tbsp oil, onions and 1/4 tsp salt to the empty skillet and cook until golden brown about 6 min. Add tomato paste and cook stirring well for 2 minutes. Add broth and soy sauce, bring to simmer and transfer to slow cooker insert.
3. Toss carrots, parsnips, potatoes 1/2 tsp thyme and remaining 1 Tbsp oil in a large bowl. Season with salt and pepper. Wrap vegetables in a foil packet that will fit in the slow cooker, folding over the seam to trap steam. Stir bay leaves and tapioca into slow cooker with the meat and onion mixture. Set the vegetable packet on top of beef.
4. Set the slow cooker to high and cover. Cook for 6-7 hours. (Or cook on low for 10-11 hours)
5. Transfer vegetable packet to a plate. Open and pour vegetables and juices into the stew. Add remaining 1 tsp thyme and peas. Let stand until the peas are heated through. Season with salt and pepper to taste.
Sunday, March 8, 2009
Homemade Snacks

I get a little wary of all the words I can't pronounce listed as ingredients in my child's snacks. I like to buy natural options or just steer clear of processed snack foods altogether. But, they are convenient and tasty after all. I will admit we have microwave popcorn and canned frosting with *yikes* trans fat in our cupboard! So, to tip the balance towards a healthier lifestyle, I like to use these recipes for snacks with ingredients I know and trust.
Soft and Chewy Granola Bars
Natural Dripless Popsicles
Homemade "Goldfish" Crackers
Homemade Cheesy Fish Crackers

You can find a fish cookie cutter- and hundreds of other varieties too- on Amazon.
From Country Living
1 cup all-purpose flour
4 tablespoons cold unsalted butter, cut into small pieces
8 ounces grated extra-sharp Cheddar cheese
3/4 teaspoon salt
1/2 teaspoon fresh-ground pepper
Make the dough: Pulse the flour, butter, cheese, 1/2 teaspoon salt, and pepper together using a food processor until the mixture resembles coarse meal. Pulse in 3 to 4 tablespoons of water, 1 tablespoon at a time, and only enough so that the dough forms a ball and rides the blade. Remove, wrap in plastic, and chill for 20 minutes or up to 24 hours.
Bake the crackers: Heat oven to 350 degrees F. Line 2 baking pans with parchment paper and set aside. Roll the dough out to 1/8th-inch thickness. Cut out as many crackers as possible using a 2-inch fish-shaped cutter. Place them 1 inch apart on the prepared baking pans. Bake until golden and crisp — 15 to 20 minutes. Transfer to a wire rack to cool. Repeat with remaining dough and scraps. Store in an airtight container for up to 1 week.
Granola Bars

Granola Bars
2 cups rolled oats
½ cup packed brown sugar
1/2 cup wheat germ
3/4 teaspoon ground cinnamon
1 cup all-purpose flour
3/4 cup raisins, craisins or chocolate chips
3/4 teaspoon salt
1/4 cup honey
1 egg, beaten
1/2 cup vegetable oil
2 teaspoons vanilla extract
1. Preheat the oven to 350 degrees. In a large bowl, mix together the oats, brown sugar, wheat germ, cinnamon, flour, your “mix ins” and salt. Make a well in the center, and pour in the honey, egg, oil and vanilla. Mix well and pat the mixture evenly into a 13x9 pan.
2. Bake for 30 to 35 minutes in the preheated oven, until the bars begin to turn golden at the edges. Cool for 5 minutes, then cut into bars while still warm. Do not allow the bars to cool completely before cutting, or they will be too hard to cut.
Natural Popcicles
This recipe is for a soft popsicle, not hard and icy like straight juice pops. The gelatin helps to keep the popsicles less drippy.
You can use individual used yogurt cups or paper cups, carefully washing them out and reusing them each time. Or make mini pops with an ice cube tray. Use Muchkin’s Fresh Food Feeder for kids too young to handle popsicles.
1 envelope unflavored gelatin
1 cup water
¼ cup sugar
Three cups of cut fruit
Heat water, gelatin and sugar in saucepan over low heat until gelatin dissolves, for about 5 minutes. Then puree the gelatin mixture in the blender with fruit. Pour the mixture into cups and wait until frozen.
photo of Watermelon Chocolate Chip popsicles from Cookie Mag
Monday, March 2, 2009
Chicken Noodle Soup

We had the flu at our house this weekend. And the only thing that sounded good to eat was...what do you know...Chicken Noodle Soup. Only problem is that I have actually never made chicken noodle soup and I didn't have a recipe. But I did have all the ingredients. So here is what I came up with.
One Pot Chicken Noodle Soup
1 onion, chopped
2 cloves garlic, chopped
pinch celery seed
pinch thyme
2 small chicken breasts, cooked and shredded
6 carrots, peeled, chopped
2 stalks celery, chopped
1/2 package egg noodles
12 cups chicken broth
In a large stock pot with a little olive oil, sautee the onion garlic, celery seed and thyme until the onions are softened and translucent. Scrape the onions into a bowl and set aside. Using leftover oil, cook the chicken, covering the pot and turning the breasts halfway through the cooking process.
Remove the breasts when cooked and wipe the pot with a paper towel to remove chicken grease. Fill the pot with 12 cups of broth and bring to a boil. Add noodles to the broth and after 3-4 minutes add the carrots and celery.
Meanwhile, take a fork and shred the chicken. When the noodles are cooked and the carrots and celery are softened, add the onion and garlic mixture you set aside. Add the chicken and continue to heat the soup for a few minutes before serving.
photo by edestlin
Sunday, February 22, 2009
Pecan Cranberry Salad
from Janelle Cluff
8 cups lettuce (red/green)
1 red onion, thinly sliced – to taste
2 crisp red apples, sliced
Toasted pecan, halves
Blue cheese, crumbled (or feta)
Dried cranberries
DRESSING:
¾ c. olive oil
3 Tbsp vinegar
3 Tbsp lemon juice
1 Tbsp Dijon mustard
Salt/pepper
8 cups lettuce (red/green)
1 red onion, thinly sliced – to taste
2 crisp red apples, sliced
Toasted pecan, halves
Blue cheese, crumbled (or feta)
Dried cranberries
DRESSING:
¾ c. olive oil
3 Tbsp vinegar
3 Tbsp lemon juice
1 Tbsp Dijon mustard
Salt/pepper
Cranberry Bliss Bars

Bars:
1 cup butter
1 1/2 cup brown sugar
3 eggs
1 1/2 tsp. vanilla
1 tsp ginger
1/4 tsp. salt
1 1/2 cup flour
3/4 cup dried cranberries (crasins)
6 oz. white chocolate pieces or chips
Frosting:
4 oz. cream cheese
3 cups powdered sugar
4 tsp. lemon juice
1/2 tsp. vanilla
Cream butter and brown sugar. Add eggs, mixing between eggs. Add vanilla, ginger, and salt. Mix. Add flour and continue mixing. Add dried cranberries and white chocolate. Spread cookie dough in a cookie sheet. Bake at 350 degrees until just barely turning brown. Blend frosting ingredients and spread on bars after they have cooled. Top with more cranberries and white chocolate.
Springtime Spinach Salad
1 bag or ¾ bunch baby spinach leaves (washed, de-stemmed and set to dry)
1-2 cups sliced fresh strawberries
2/3 cup craisins
¼ cup halved walnuts
1 1/2 tablespoons light brown sugar object2=">
1 1/2 teaspoons egg white object2=">
1/8 teaspoon salt
Poppy Seed Salad Dressing
1 ½ cups vegetable oil
¾ cup red wine vinegar
¾ tsp dry mustard
1 ½ tsp salt
½ cup sugar
½ Tbsp dry onion
½ tbsp poppy seeds
object2=">
Toss chopped walnuts in a bakng dish with sugar, egg white and salt. Bake at 350 for about 5 minutes. Set on a paper towel to cool. For the dressing, pour ingredients into a cruet, Tupperware or Ziploc bag and shake vigorously until it emulsifies.
Spread spinach leaves over dinner plates and top with poppy seed dressing, craisins sliced strawberries and candied walnuts.
Effortless Spinach Salad
Salad
1 bag fresh spinach
1/2 cup honey roasted sunflower seeds (just the meat, not the shell)
1 large apple, diced
Raspberry vinaigrette to taste
Okay pretty sure you all know how to make a salad by now :) :)
1 bag fresh spinach
1/2 cup honey roasted sunflower seeds (just the meat, not the shell)
1 large apple, diced
Raspberry vinaigrette to taste
Okay pretty sure you all know how to make a salad by now :) :)
Monday, February 16, 2009
Peanut Soup and Fortune Cookies

Maybe you are like me and missed the Chinese New Year and still really want to try out Theresa's crafty centerpiece. Or maybe you like food with an Asian kick and have a hankering for a good fortune. Here are two recipes worth a try and a quick rice tip too.
Haven't the slightest clue what fortunes to wrap up in your cookies? Go here for the longest list of fortunes I have ever seen- this guys eats a lot of cookies.
Super Simple Peanut Soup with Vegetables
Fortune Cookies
Cook's Illustrated Quick Tip: Rice at the Ready

Making rice is not one of my favorite things. I rarely get it just right.And its takes such a long time. But with some steamed, frozen stir fry veggies, soy sauce and some ready made rice you have got yourself a quick and healthy lunch or dinner.
To have rice at the ready prepare a double batch of rice the next time you make rice. Spread half of the rice on a baking sheet to cool and break up any clumps. Place the cooled rice in a zip lock freezer bag and freeze until the next time you want to make a speedy rice bowl.
Sunday, February 15, 2009
Fortune Cookies
by Gale Gand
Ingredients- makes 20 cookies
* 2 egg whites, room temperature
* 6 tablespoons butter
* 1/4 cup sugar
* 1/2 cup flour, sifted
* 1/4 teaspoons vanilla extract
Directions
Cut a stencil out of a plastic lid in the shape of a 3-inch disk. Whip the egg whites until stiff and chill. In a mixer, cream the butter, then add the sugar and continue mixing. Add the flour and blend in, then add the vanilla and blend again. Add the chilled egg whites and mix on low until well incorporated and the batter is smooth. With a small spatula, spread batter through the stencil so it is a circle onto wax paper on a cookie sheet, about 6 per cookie sheet. Bake in a preheated 350-degree oven until light golden brown, 7 to 8 minutes. Quickly remove the pan from the oven and one at time place a fortune across the center with a bit hanging out. Fold cookie circle in thirds over fortune with flaps only slightly overlapping each other. Turn over and bring opposing sides together and pinch. Let cool.
Cook's Illustrated Quick Tip: Rice at the Ready
Making rice is not one of my favorite things. I rarely get it just right.And its takes such a long time. But with some steamed, frozen stir fry veggies, soy sauce and some ready made rice you have got yourself a quick and healthy lunch or dinner.
To have rice at the ready prepare a double batch of rice the next time you make rice. Spread half of the rice on a baking sheet to cool and break up any clumps. Place the cooled rice in a zip lock freezer bag and freeze until the next time you want to make a speedy rice bowl.
Subscribe to:
Posts (Atom)